Seeing your vibrant, fragrant mint plant start to turn brown can be a real heartbreaker. It's like watching a friend lose their spark! But don't despair just yet. Browning leaves on mint plants are a common problem, and often, the cause is easily identifiable and correctable. Let's dive into the reasonswhy your mint plant might be turning brownand how you can bring it back to its lush, green glory. Why is My Mint Plant Turning Brown? Common Causes The mystery of the browning mint can often be solved by playing detective in your garden. There are several common culprits that contribute to this unfortunate situation. Understanding these potential causes is the first step towards restoring your mint plant's health. Think of it as a process of elimination - checking off the possible suspects one by one. Watering Issues: Too Much or Too Little Watering problems are probably the most frequent cause of brown leaves on mint. Mint plants are fairly ...
Mint, oh mint! That fragrant, vibrant herb that can elevate everything from a simple glass of water to a complex cocktail. But the secret to a thriving mint plant isn't just about watering and sunlight; it's about knowingwhento trim it. Get it wrong, and you could end up with a leggy, lackluster plant instead of a lush, aromatic bounty. Let's dive into the wonderful world of mint trimming!
Why Trimming Your Mint Plant Matters
Trimming your mint plant isn't just about aesthetics; it's crucial for the health and productivity of your herb. Think of it as giving your mint a little encouragement to be its best self. Here's why regular trimming is a must:
- Encourages Bushier Growth: Mint, by nature, tends to grow tall and leggy if left unchecked. Trimming forces the plant to produce side shoots, creating a denser, bushier plant with more leaves – and more flavor!
- Prevents Flowering (Sometimes): While mint flowers can be pretty, they signal the plant to put its energy into seed production rather than leaf growth. Trimming off flower buds redirects that energy back into producing flavorful leaves. However, if youwantflowers (to attract pollinators, for example), you can let some branches bloom.
- Controls Spreading: Mint is notorious for being an aggressive spreader. Trimming helps to contain its growth, preventing it from taking over your entire garden. This is especially important if you're growing mint in the ground.
- Maintains Plant Health: Removing dead or damaged leaves prevents the spread of disease and allows for better air circulation within the plant.
When to Trim Mint: Timing is Everything
Knowing therighttime to trim your mint plant is key. There isn't a single "magic date," but rather a few key indicators to watch out for:
Regular Maintenance Trimming Throughout the Growing Season
The most important thing to remember aboutwhen to trim mint plant is to do it regularly throughout the growing season. This usually means from spring until the first frost in fall. Aim to trim your mint plant every few weeks, or whenever it starts to look a bit unruly. Don't be afraid to be generous! You can remove up to one-third of the plant at a time without harming it. Consistent trimming throughout the growing season will encourage a bushier plant and prevent it from flowering too early.
Trimming Before Flowering
As we mentioned, mint flowers signal a shift in the plant's energy. If you want to maximize leaf production,trimming mint before it flowers is essential. Keep a close eye on your plant and pinch off any flower buds as soon as you see them. This will encourage the plant to focus its energy on producing more flavorful leaves. If you miss a few and the plant flowers, don't worry! Just trim off the entire flowering stem. Leaving the flowers on can also slightly alter the taste of the leaves, often making them a bit more bitter.
Major Harvest Trimming
If you need a large quantity of mint for a specific recipe or want to preserve some for later use, you can perform a more significant harvest trim. Aim to harvest in the morning, after the dew has dried but before the sun becomes too intense. This is when the essential oils (and therefore the flavor) are most concentrated. You can remove up to two-thirds of the plant during a major harvest. Be sure to leave at least a few inches of growth so the plant can recover quickly. This type oftrimming mint plant is different than the general, maintenance trimming discussed earlier.
The Autumn Trim: Preparing for Winter
As the growing season winds down, give your mint plant one final trim before the first frost. This helps to tidy up the plant and prevent any dead or decaying leaves from rotting over the winter. Cut the plant back to just a few inches above the soil line. Mulch around the base of the plant to protect the roots from the cold. In colder climates, you may want to bring potted mint plants indoors to overwinter.
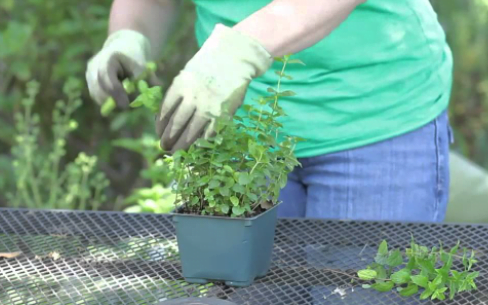
How to Trim Mint: A Step-by-Step Guide
Now that you knowwhento trim, let's talk abouthow. It's actually a very simple process.
- Gather Your Tools: You'll need a pair of sharp, clean scissors or pruning shears. Clean tools prevent the spread of disease.
- Identify Trimming Points: Look for stems that are getting too long, flower buds, or dead/damaged leaves.
- Make the Cut: Cut the stem just above a set of leaves. This encourages new growth to emerge from that point.
- Don't Overdo It: As mentioned before, avoid removing more than one-third of the plant during regular maintenance trims, and no more than two-thirds during a major harvest.
What to Do With Your Mint Trimmings
So, you've trimmed your mint plant. Now what? Don't let those fragrant clippings go to waste!
- Use Them Fresh: Add them to drinks, salads, desserts, or any dish that could benefit from a burst of minty flavor.
- Dry Them: Hang the clippings upside down in a cool, dry place until they're completely dry. Store the dried mint in an airtight container.
- Freeze Them: Chop the mint and freeze it in ice cube trays filled with water or olive oil. These minty cubes are perfect for adding to drinks or sauces.
- Make Mint Tea: Steep fresh or dried mint leaves in hot water for a soothing and refreshing tea.
- Propagate New Plants: Mint cuttings root easily in water. Place the cuttings in a glass of water and wait for roots to form. Once the roots are a few inches long, you can plant the cuttings in soil.
Mint is a fantastic addition to any garden or kitchen, and proper trimming is the key to enjoying a bountiful harvest of flavorful leaves. By following these tips, you can ensure that your mint plant thrives and provides you with fresh, aromatic mint for years to come.
If you find yourself spending a lot of time tending to your mint and other plants, consider using a comfy garden kneeler to ease the strain. The KVR Upgraded Garden Kneeler and Seat, with its thick kneeling pad, can make gardening more enjoyable. This handy gardener stool, with included tool pouches, could be a real game-changer for your gardening routine. You can find it here: https://amzn.to/4mhl Mx I.