Seeing your vibrant, fragrant mint plant start to turn brown can be a real heartbreaker. It's like watching a friend lose their spark! But don't despair just yet. Browning leaves on mint plants are a common problem, and often, the cause is easily identifiable and correctable. Let's dive into the reasonswhy your mint plant might be turning brownand how you can bring it back to its lush, green glory. Why is My Mint Plant Turning Brown? Common Causes The mystery of the browning mint can often be solved by playing detective in your garden. There are several common culprits that contribute to this unfortunate situation. Understanding these potential causes is the first step towards restoring your mint plant's health. Think of it as a process of elimination - checking off the possible suspects one by one. Watering Issues: Too Much or Too Little Watering problems are probably the most frequent cause of brown leaves on mint. Mint plants are fairly ...
Mint, that fragrant, invigorating herb, is a staple in many gardens and kitchens. But knowing how to properly harvest it is key to ensuring a healthy, abundant plant that keeps giving you fresh leaves for your mojitos, teas, and culinary creations.
The Art of Cutting Mint: A Guide to Harvesting Your Herb
Harvesting mint isn't just about snipping off a few leaves. It's about understanding the plant's growth cycle, using the right tools, and employing the correct techniques to encourage continued production. Let's delve into the details of how to best cut your mint from the plant.
Why Proper Mint Cutting Matters
Why can't you just rip off leaves willy-nilly? Well, improper cutting can lead to several issues:
- Stunted growth: Damaging the main stem can slow down or even stop the plant's growth.
- Disease: Open wounds from rough handling can make your mint susceptible to fungal infections or other diseases.
- Reduced yield: Improper harvesting can actuallydecreasethe amount of mint you can harvest over time.
Properly cutting mint, on the other hand, encourages bushier growth and a larger yield of flavorful leaves. It's a small effort that yields big results.
When to Cut Mint: Timing is Everything
The best time to harvest mint is in themorning, after the dew has dried but before the sun gets too strong. This is when the essential oils, which give mint its flavor and aroma, are at their peak concentration.
Here's a more detailed breakdown:
For Flavor: Harvest before the plant flowers. Once it starts to flower, the leaves can become a bit bitter. You can pinch off the flower buds to encourage continued leaf production. For Growth: Regular harvesting encourages the plant to produce more leaves. Don't be afraid to cut it back! For Large Harvests:You can cut back the entire plant by about two-thirds several times during the growing season. It will bounce back quickly!
Tools of the Trade: What You'll Need
Having the right tools makes the process much smoother and minimizes damage to your mint plant.
Sharp Scissors or Pruning Shears: This is the most important tool. Make sure your scissors or shears are clean and sharp. Dull blades can crush the stems and make them more vulnerable to disease. Basket or Bag: To collect your harvested mint leaves. Gloves (Optional):Mint oils can sometimes irritate sensitive skin.
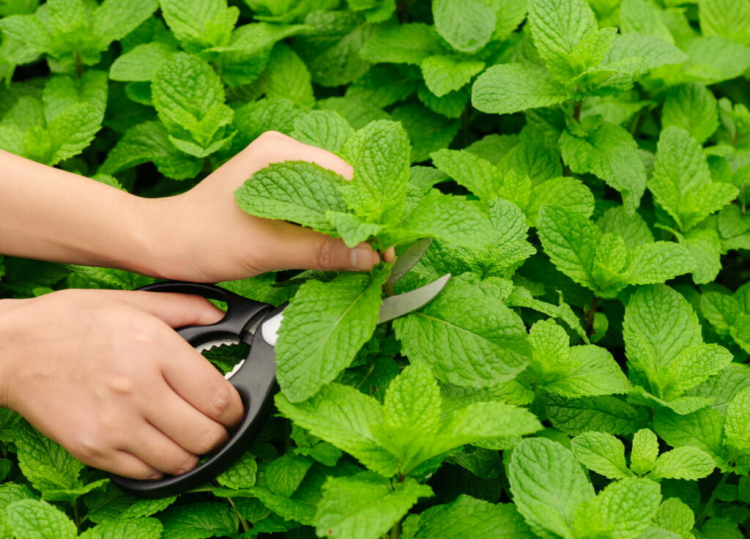
The Correct Way to Cut Mint From the Plant
Now, let's get down to the nitty-gritty: how toactuallycut the mint.
- Identify the Stem: Look for healthy stems with plenty of leaves.
- Make the Cut: Using your sharp scissors or shears, cut the stem just above a set of leaves (a leaf node). This encourages new growth to sprout from that point.
- Don't Over-Harvest: As mentioned earlier, you can cut back the entire plant by about two-thirds, but generally, avoid taking more than one-third of the plant at any one time. This gives the plant enough energy to recover and continue growing.
- Pinch off Flowers: If you see any flower buds forming, pinch them off. This will redirect the plant's energy into producing more leaves.
Cutting above a leaf node is key. This is where new shoots will emerge, leading to a bushier, more productive plant. Avoid cutting the main stem too low, as this can severely impact the plant's overall health. Think of it as giving your mint plant a regular haircut – it keeps it looking tidy and encourages growth!
Cutting Mint for Different Purposes
The way you cut mint might vary slightly depending on what you plan to use it for.
For Fresh Use: Cut stems as needed for immediate use in cooking, drinks, or garnishes. For Drying: Harvest larger quantities of mint at once, ideally before flowering, and dry them for later use. To dry mint, bundle the stems together and hang them upside down in a cool, dry, well-ventilated place. You can also dry the leaves in a dehydrator. For Propagation:You can also cut stems of mint for propagation. Cut a stem that is at least 4 inches long and remove the lower leaves. Place the stem in water and wait for roots to grow. Once the roots are about an inch long, you can plant the stem in soil.
Caring for Your Mint After Cutting
After harvesting, give your mint plant a little extra TLC to help it recover.
Water Well: Ensure the soil is moist, but not waterlogged. Fertilize (Optional): You can give your mint plant a light feeding of balanced fertilizer to replenish nutrients. A simple organic fertilizer works well. Check for Pests and Diseases:Keep an eye out for any signs of pests or diseases. Address them promptly to prevent them from spreading.
By following these simple steps, you can ensure that your mint plant remains healthy and productive, providing you with a steady supply of fresh, flavorful leaves for all your culinary and beverage needs.
Gardening can be tough on the knees and back, so if you're looking for some support, consider an upgraded gardening aid. TheKVR Upgraded Garden Kneeler and Seat with Thicken & Widen Soft Kneeling Pad is a great option for comfortable gardening, including harvesting herbs. It even has 2 Tool Pouches! This handy and heavy-duty Foldable Gardener Stool makes a perfect Gardening Gift for Women Mom Men. Check out this upgraded gardening kneeler and seat here: https://amzn.to/4mhl Mx I.